The husband had taken two weeks off in May, for a trip over to our place in France. But we’ve been waiting a few months to have someone come in and fix our boiler (no hot water!) and since we weren’t 100% sure it would be fixed by the time vacation time rolled around, we held off on buying flights til the last possible moment.
Good thing we did. Let’s just say we’re still hot-waterless over the pond.
So there we were, two DIY-ers with a two week vacation and no place to go. Hmm, we thought, our kitchen is small, we could redo our kitchen in two weeks, right? Right?
You see, a kitchen renovation has been high on our list of major improvements to our house (right up there next to converting the upstairs Jack & Jill bathroom into two full baths).
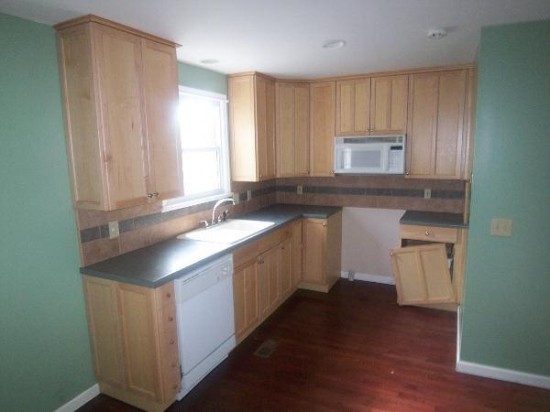
We’ve only shown the picture before once or twice, but here’s what our kitchen looked like when we moved in, in all its glory:

See that cabinet with the door hanging off on the right? We had to wood putty the hinge back into the cabinet side just to make it functional. And a few weeks after we moved in, we were cleaning out some of the drawers and actually found a broken egg that had been fermenting for god knows how long behind one of them. Yuck.
Pro Tip: Foreclosures are awesome, but be prepared for little, not so pleasant surprises.
We immediately painted the walls and bought new stainless steel appliances, but had been putting off a complete redo because we knew that even though it was a small space, it would still be a big project.
But with two whole weeks, we figured we could use the money we would have spent on flights on the materials we needed and have the time to finish most (if not all) of the work.
The Plan
There’s no doubt about it, our kitchen is TINY. And in the old design, the space utilization was horrible: over-sized sink, useless cabinets (like the strange narrow one to the left of the dishwasher in the above pic – the front is actually a door), and 42″ top cabinets that made the room feel even smaller, robbed us of vertical counter top space, and provided utterly useless top shelf storage because nobody could easily reach it.
So, needless to say, we had a bunch of opportunity with out new design to improve the space.
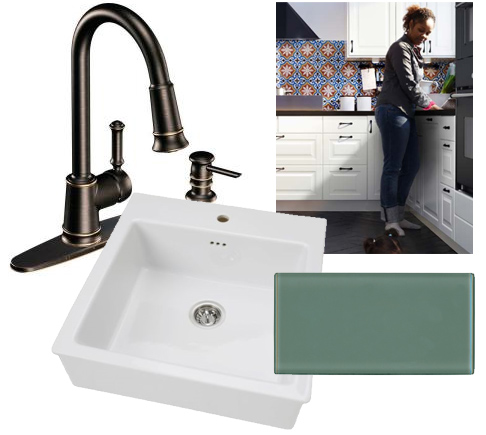
This was the plan:

- New white IKEA cabinets (30″ instead of 42″ for the top cabinets)
- Smaller, single bowl, farmhouse style sink (IKEA)
- Replace countertops with black granite (or if necessary, more cost-effective material)
- Add under-cabinet lighting (IKEA)
- Oil-rubbed bronze accents for faucets and door handles
- Crown Moulding
- New subway tile backsplash
The Reveal
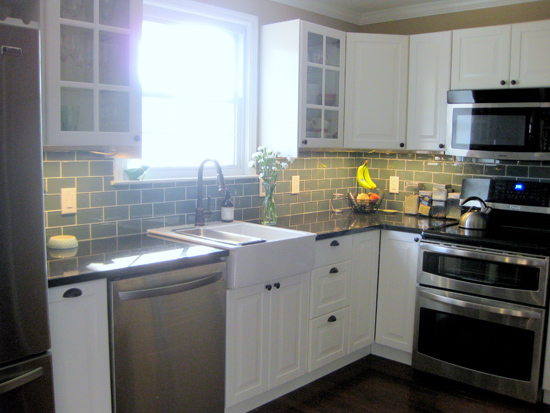
Enough with the suspense, cue the music… here’s our new kitchen:

The project was not without its share of bumps and minor hurdles (we were originally expecting to spend about a week on everything, but it turned into more like 2+) but it definitely wasn’t anything like some of the episodes of Renovation Realities we’ve watched before.

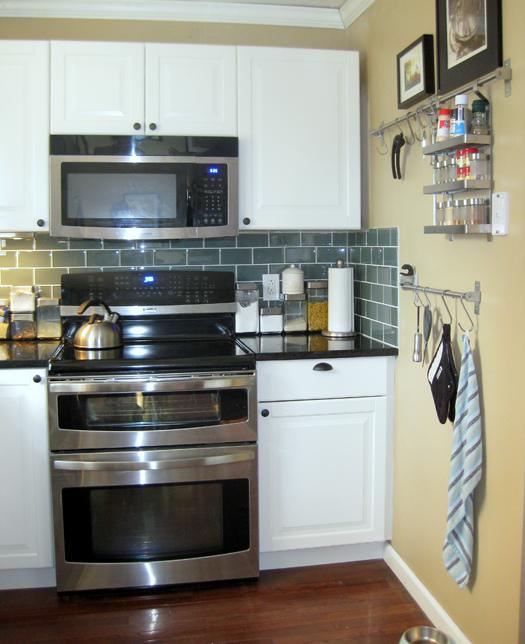
Even though there are still a few final touches we need to wrap up (notice the gap on the right side of the cabinet above?), I’m already super-proud of how awesome the new space looks. Plus, even though we technically lost upper storage space by replacing 42″ cabinets with 30″ ones, it feels like we’ve GAINED space with all of the new organizational goodies from IKEA.
Favorite New Features
Other than the obvious part of having a great new kitchen, there’s a few things we’re particularly enjoying:
- Soft-close doors and drawers. A standard in IKEA kitchens, it’s one of those small things that you never can imagine living without once you have experienced it.
- Glass doors on the cabinets next to the window. We plan to get some more decorative plates down the road, but for right now, we’re just enjoying how much more light and airy they make everything feel.
- New wine rack. You can’t see it very well in these photos, but because of the way we re-arranged the space, we were able to add an upper wine rack, right next to the fridge. Which is awesome, because we never had a very good way to store wine before.
- Under cabinet lighting. If you’re re-doing your kitchen, this should be #1 on your list of things to add. In addition to making the glass tile literally sparkle, it really illuminates all the dark little corners of the kitchen and makes everything feel lighter and brighter.
- Farmhouse sink & strainer. Getting rid of the two bowl sink was one of the best decisions we made; we gained back some extra counter space (already at a premium) and it looks awesome. One of my favorite things is the strainer that’s made for the sink – I love being able to wash fruits and vegetables in it.

The Budget
I’m pretty sure we saved a significant amount by doing the labor on this kitchen ourselves.
Surprisingly, the demo was not only the hardest part, but also the point where we ran into the most time consuming surprises (like having to replace whole chunks of drywall because the old backspash was adhered to backboard which was glued to the drywall). I’d hate to think how much it would have cost to have someone deal with those problems.
All said and done, we spent about $5000 on the redo. We plan to have a re-appraisal done soon on the house, but I’m pretty sure the overall value bump would be more than that. Just as important, WE really love the space and are looking forward to all the cooking and baking we’ll be able to do in it over the next few years.
Here’s the cost breakdown for the curious:
AKURUM Cabinets with LIDINGO doors & trim (IKEA) – $2300
(we actually over-bought on some trim door hinges, etc, so these will be going back)Granite Counter Tops – $1300
Subway Tile – $700
Faucet (Home Depot) – $250
Extra materials (drywall, dumpster purchase and haul-away, caulk, crown moulding, door knobs, etc) –aprox. $500
Total Cost: $5050
The big splurges here were the granite counter tops and subway tiles.
We priced around a bunch of different places for counter tops (and looked at a variety of different materials) but ultimately settled on a local provider who could get us real granite at $40 a sq foot and could have it installed in just a few days (most folks were several weeks out). Since we had such a small surface to cover, we could justify the expense.
The tiles were from our favorite local tile supplier, The Tile Shop. While we probably could have found something cheaper, we knew the glass tiles would help make the room. It’s the first thing that you see walking into our front door, so we really wanted it to pop. Again, the decision was made a bit easier because we were working with such a small space.
The Bottom Line
We couldn’t be happier with our kitchen renovation. IKEA makes some awesome cabinets and I think the real trick to getting a custom, high end feel is in accessorizing with non-IKEA finishes.
We’re still on the hunt for the perfect over-the-sink pendent light, but we’re also sooo happy all the hard work is over. Have you guys redone your own kitchen before? I feel like our ability to knock it out in 2 weeks was pretty impressive, but we also weren’t moving any plumbing) … I can’t imagine have no kitchen for longer than that.

Love it! The subway tiles are beautiful.
Well done!
Thanks!! They’re one of our favorite things too :)